Apple Cranberry Baked Brie

I have to admit that I cannot take credit for this recipe. I recently became a Pampered Chef Consultant and did a cooking demo of this recipe for my first two shows. It was so good that I had to share it!

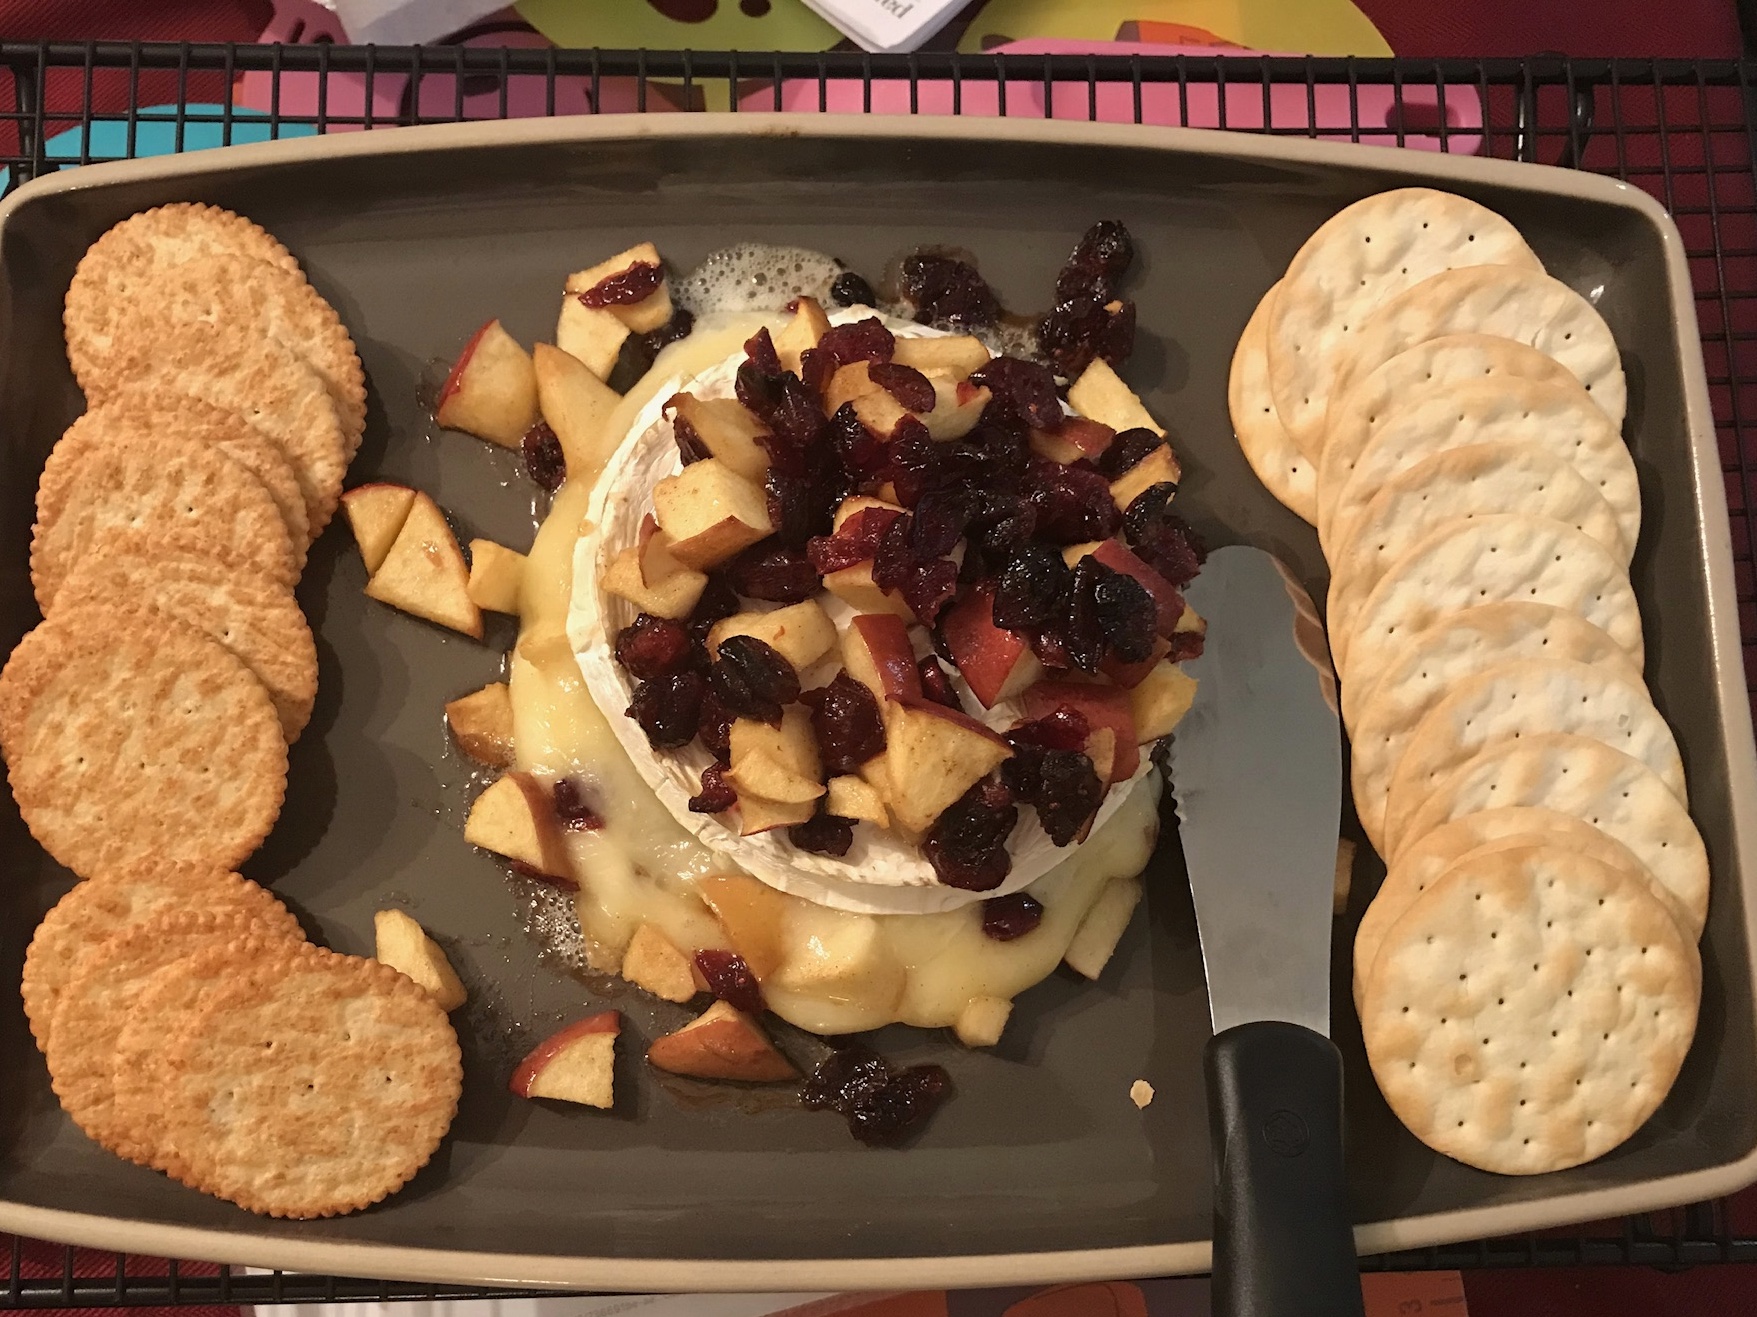
I love brie and always feel it makes an impressive and delicious appetizer. The cheese is pretty to look at and I love the combination of flavors and textures. When it melts it is rich, gooey decadence and easy to slather on crackers or bread. There was not one bit left after everyone tried it and got rave reviews!

I started selling Pampered Chef products because I have loved them for over 20 years. I personally know that their kitchen gadgets, cookware, knives and serving pieces make a difference in my prep time and cooking. The items are so practical and smart (hello, garlic press!) and it is my hope to share them with others. I was not sure if I would share the Pampered Chef items on this blog as I started it out many years ago as a way to share my recipes and still want it to be about the food. I then thought that if I can help my readers by suggesting products that I love and use everyday it may help them too, and no one has to buy a thing if they are not interested. So, after much back and forth, I decided that I will list the Pampered Chef tools I used to create each recipe and if there is anyone interested in any of them please let me know 🙂

https://www.pamperedchef.com/pws/mickykramer


Prep Time:  10 minutes

Cook Time:  15 minutes

Yield: 5 – 8 servings


½ cup chopped apples

¼ cup of sliced almonds (optional)

½ cup dried cranberries, i.e. Crasins

¼ teaspoon ground cinnamon

1 tablespoon brown sugar

1 tablespoon butter

pinch of salt

1 round brie (8 oz.)


Pre-heat oven to 350 degrees

Add the apples, cranberries, almonds, brown sugar and a pinch of salt to a bowl.  Melt the butter in the microwave in a glass or silicone bowl for about 20 seconds.  Add the melted butter to the apple mixture and stir so that all the ingredients are coated in the butter and well combined. 

Cut brie in half through the center of the circle so that there is an equal top and bottom (the shape of a hamburger bun).

Place the bottom half of the brie rind side down on a baking sheet or platter that can go into the oven.  Scoop half of the apple mixture onto the brie.  Add the second piece of brie to the top with the rind facing up and add the rest of the apple mixture. 

Cook for 15 minutes until cheese is very soft.  Serve with crackers, crostini or sliced French bread. 

Suggested Pampered Chef Tools:

  • Close and Cut with Chef knife
  • Flexible cutting mat
  • Santuko knife or utility knife
  • Glass mixing bowl set
  • Entertaining Platter
  • Apple wedger
  • Measuring spoon set
  • Measuring cup set
  • Spreader


Advertisement

Leave a comment

Filed under Appetizer, Dairy

Cauliflower Fried Rice

I love taking a recipe that may not be the healthiest or most nutritious and making it more health conscious. That is how I came up with this cauliflower fried rice recipe. Traditional fried rice is made with white rice, lots of oil, not a lot of vegetables and a ton of sodium. It is high in fat and high in carbs. My creation substitutes the white rice for cauliflower “rice” which is higher in fiber and vitamins and has significantly less carbs. If you have never used cauliflower “rice” I suggest you try it out! You can certainly process it yourself but I take the easy route and buy the package that is already done as it is a huge time saver. I have found it in the fresh produce section and/or frozen section of my regular supermarket. I use a minimal amount of oil, low sodium soy sauce, a lot of veggies and chicken breast for lean protein. It is a great “fake out” for the real thing. I actually would argue that it tastes better and is more filling and satisfying.

If you would rather make it vegetarian or vegan you can leave out the chicken and/or egg. I do not know much about Keto but think this would be fine if you are doing it. You can also add any veggies you would like and can take out any you do not. It can be served either as a main dish or side dish. When I was losing weight I ate this ALL the time in that I did not feel like it was “diet” food and I was looking for ways to feel satisfied and not deprived. This recipe does both!


Prep time: 10-15 minutes

Cook time: 15 minutes

Yield: 3 – 4 servings


1/2 lb. chicken breast cut into thins strips (I start with chicken tenders to make it quicker to cut) you can substitute boneless chicken thighs if you prefer dark meat

1 tablespoon canola oil, plus 1 teaspoon

2 large cloves of garlic minced

2 teasopooons grated fresh ginger or fresh ginger paste

1 medium yellow onion chopped

1 bell pepper (any color) finely chopped

10 baby carrots or 1 large carrot chopped

1 stalk celery finely diced (can also use bok choy)

1/4 cup mushrooms finely chopped

1/4 cup frozen peas

12 oz. bag of riced cauliflower

1 egg

2 tablespoons low sodium soy sauce

1 teaspoon sesame oil

2 scallions finely chopped

Sriracha chili sauce (optional)


Heat one tablespoon of oil in a large skillet or wok over medium heat. Add the chicken and saute until just cooked through. Add the onions, ginger and garlic and saute until the garlic is fragrant and the onions begin to be translucent, about 2-3 minutes.

Add the carrots, pepper, celery and mushrooms and cook another 2-3 minutes until the vegetables begin to soften. At that point add the riced cauliflower and stir to combine well. Continue cooking over medium heat and add the soy sauce stirring until the cauliflower also begins to soften and the soy sauce is covering the mixture, about 5 minutes.

Make a spot in the middle of the pan and add a teaspoon of oil. Crack the egg in the whole and scramble it in the pan until cooked through. Add the frozen peas and drizzle in the sesame oil. Stir so that everything is mixed well.

I usually garnish with chopped scallions and Sriracha chili sauce since I like it spicy. You can leave it off if you do not. It is great eaten the same day and leftovers are good as well!

4 Comments

Filed under Uncategorized

Spinach Quiche

Tonight I did a cooking demo of one of my favorite recipes, Spinach Quiche. It was a huge hit! The theme of the night was “Power Breakfasts” and this fit right in. It is a low-fat, high protein recipe that is great for breakfast, brunch, lunch or even dinner. It is extremely versatile in that you can change up the vegetables you use. I personally love adding mushrooms, artichokes, zucchini, peppers or tomatoes. You can also play around with the cheeses you use. I have made it with cheddar and feta cheeses and they were also very good.

The secret ingredient is low-fat cottage cheese. I use either 1 or 2 percent which is the base of the quiche mixture and what makes this recipe unique. I also only use three eggs and one egg white in the entire quiche whereas typical quiche recipes use heavy cream, full-fat cheese and many more eggs or egg yolks. I was watching the skeptical faces of 50 woman as I was making the quiche thinking there is no way this is going to taste good! Afterwards, I had 50 women coming up to me to tell me how delicious it was 🙂

It is impressive enough to serve for company and also easy enough to make on a Sunday night so that you have a great and filling breakfast for the week. You have the option of making it with a crust in this recipe or without a crust as in my Greek Crust-less Quiche.


Prep time: 10 minutes

Cook time: 50 – 60 minutes

Serves: 6 – 8


2 teaspoons olive oil

1 small onion, finely chopped

1 box frozen chopped spinach, defrosted

3 extra large eggs and 1 egg white

1 (8 ounce) packet of part-skim mozzarella cheese

12 ounces low fat cottage cheese

Kosher salt and fresh cracked pepper

1 pre-made frozen pie crust


Preheat oven to 375 degrees F.

Place olive oil in a frying pan and heat over medium heat.  Add the onion and  sauté the onion until softened and slightly brown, about 5-7 minutes.  Let cool.  Defrost spinach and squeeze out all excess water.  This is an important step.  If you leave liquid in the spinach the quiche will be watery and not firm. If you are adding other vegetables you should saute those as well and drain them if they produce a lot of liquid in the cooking process.

In a large bowl combine the eggs, egg white, cottage cheese and cheese.  Add onion and spinach and mix well.  Season with a pinch of salt and freshly cracked pepper

Add the mixture to pie crust and bake at 375 degrees for 40-50 minutes.  The top of the quiche should be golden and firm.

Let stand at least 10 minutes before serving in order for the quiche to set.

https://testmyrecipes.com/2014/05/19/greek-crustless-quiche/

Leave a comment

Filed under Breakfast, Eggs

Turkey Chili

I am excited to share one of my favorite go-to’s, Turkey Chili.  When I started my weight loss journey I came up with a few recipes that were easy,  nutritious and most importantly, taste great!   One of the reasons I was successful in losing 60 pounds is that I know how to cook.  I never felt like I was on a “diet” because I came up with recipes like this which are extremely satisfying and filling. I made this once a week for months and still cook it often now. 

I usually make this with dark meat ground turkey – ground turkey thigh.  I think it more flavorful and filling with the dark meat.  It can also be made with ground turkey breast, lean ground beef or veggie crumbles if you want to make it vegan.  The chili has a great taste due to the fresh garlic, onion and pepper.  The spice combination is wonderful; the vinegar adds a little bit of tang while the bay leaf adds depth of flavor.  

It is fun to add different toppings.  Some of my favorites are guacamole or plain diced avocado, diced tomatoes, scallions, fresh cilantro or crushed tortilla chips.  The more toppings the better in my opinion!  I also like to add a few dashes of hot sauce and a squeeze of lemon or lime right before serving.  


Prep Time: 5 Minutes

Cook time: 25 minutes

Yield: 3 – 4 servings


1 tablespoon olive oil

1 large onion, diced

4 large cloves of garlic, minced

1 medium bell pepper, diced, any color you like

1 pound ground turkey

8 oz. can of beans, either black beans or kidney beans, rinsed and drained

8 oz. can of fire roasted diced tomatoes

¼ can of water

1 tablespoon vinegar (either red wine or apple cider)

1 teaspoon tumeric

1 tablespoon chili powder

1 teaspoon dried oregano

1 teaspoon cumin

1 bay leaf (optional)

½ teaspoon kosher salt

A few grinds of black pepper


Heat olive oil over medium heat in a heavy bottom pot.  Add the onion, bell pepper, turmeric and a pinch of kosher salt. Sauté until the onions begin to soften and garlic is fragrant, about 5 minutes.    

Raise heat to medium-high. Add the ground turkey and sprinkle in ½ teaspoon salt, the chili powder,cumin,  pepper and oregano.  Work spices into the meat cook until it is crumbled and no longer pink, about 5-7 minutes.

Add the beans, diced tomatoes, vinegar and bay leaf.  I put a little bit of water into the tomato can and stir it around to get the stuck tomatoes and juice out and add that to the pot as well.  Stir well so that all the ingredients are cooking together. Bring to a boil. Cover with a tight lid and reduce the heat to low.  Let simmer for 10 minutes.  After 10 minutes, remove the lid, stir well and it is ready to serve. 

1 Comment

Filed under Meat, Soups

Asian Lettuce Wraps

Welcome to my first post in over four years!  I am still amazed that there are people coming of this blog on a daily basis without new content.  I would like to think that it is because the recipes and articles I have published in the past are timeless and useful to the readers who have been visiting site in my absence.  Thank you to all of the followers!  

Even though I have not been actively blogging I can assure you that I think about it often, have written dozens of posts in my head and envisioned a grand relaunch.  The reason I actually am writing this post is because I am scheduled to cook this for a group of 50 ladies this week for my local Chabad Culinary Club.  I was forced to put pen to proverbial paper and write this recipe. I figured that since I was taking the time to actually type it out I should post it as well.  And here we are.

I have had the opportunity to demo other recipes for the club in the past.  It meets once a month and is a place to learn new recipes, sample tasty food and socialize.  This month the theme is Asian food and I thought my Lettuce Wraps would be a fun dish to add to the menu.  They are easy, healthy and so very delicious.

There is another reason I wanted to share this dish.  While I have been on hiatus from blogging I have been on a weight loss journey that has changed my life.  I have lost 60 pounds over the past 2 years and have kept it off for over a year.  The transformation has been equally physical and mental.

These lettuce wraps have been a staple for me while losing and maintaining my weight. They can be made with ground chicken, lean ground beef or veggie crumbles if you would like to make them vegan.  They are a popular  restaurant menu item, and there is no reason you cannot easily make them at home with probably half the fat and sodium.  They are incredibly flavorful and have a good amount of veggies as well as protein which makes them surprisingly filling.  Plus, who does not love eating a lettuce wrap?

I hope to share the many other recipes that have helped me with my weight loss.  Between my hectic job, family, kids activities and my own fitness and self care blogging simply fell by the wayside.  It is my hope that this first step will be the impetus I need to share the dozens of posts, recipes and tips that have been floating around in my head all these years.


Prep Time: 10 Minutes

Cook Time:  20 Minutes

Yield: 4 servings


1 head bibb, butter or romaine lettuce

1 pounds of ground chicken breast or lean ground beef

1 tablespoon olive oil

1 large onion, diced very small

4 scallions, chopped

4 large cloves of garlic, minced 

4 teaspoons of freshly grated ginger or ginger puree (frozen such as Dorot or fresh)

8 oz. crimini mushrooms, chopped fine

1 medium green pepper, diced small

2 tablespoons low sodium soy sauce

1 tablespoon seasoned rice wine vinegar

1 teaspoon toasted sesame oil

1 teaspoon Siracha hot sauce (optional, more if you like it spicy)

1 teaspoon kosher salt

Take apart the head of lettuce, rinse each leaf and set aside to dry on paper towels.

Heat olive oil in a large skillet over medium heat.  Sauté the ground meat with a healthy pinch of kosher salt until cooked almost all the way through and crumbly, about 5 minutes.

If you are using ground beef it is best to remove it from the pan and drain the excess fat.  If you are using ground chicken breast or veggie crumbles you can leave it in the skillet.

If you have a mini chopper, or mini food processor it is easy to put in the garlic, ginger and onions and pulse until it is finely chopped.  This a time saver especially if you are making more than one batch.  

Add the diced onion, 2 chopped scallions, green pepper, garlic and ginger.  If the vegetables are sticking, you can add a bit more oil.  Cook over medium heat, stirring often until the onions are translucent, about 5 minutes.  Add the mushrooms and cook for another 3 or 4 minutes until all the vegetables have softened.  If your ground beef is on the side this is where you would add it back to the skillet.

Add soy sauce and rice wine vinegar and stir well.  Lower heat to low and add the hot sauce and toasted sesame oil.  Allow the mixture to cook for 3 or 4 more minutes so that all the flavors combine.

If your lettuce is wet you will want to pat it dry before serving (no one wants to eat a soggy lettuce wrap).  Place a generous amount of the meat mixture in the middle of each lettuce leaf.  Garnish with finely chopped scallions.

4 Comments

Filed under Meat, Uncategorized

Pasta with Red Sauce

The kosher link up for this month is “The One Food You Would Want If Stranded On An Island” (see below!)  It was actually not hardpasta 2 for me to pick the recipe.  My favorite food is easily Italian – pizza, pasta, ziti, lasagna.  I love it all!  The best part of Italian food is the red sauce.  I don’t know what it is about this sauce – the garlic, the tomatoes, the basil.  I am not sure but it is a combination that I love and crave.  It is also nice in that it is so, so easy to prepare.  Once I realized how simple it is to make this sauce I never went back to  jarred sauce (many have a lot of sugar, salt and/or preservatives).  That and my husband grew up in Brooklyn and eating jarred sauce is blasphemy.  Hopefully, once you try the recipe you will feel the same.

Being that I make this once a week I try to make it as healthy as possible and change it up.  I will use a high fiber/high protein pasta, a whole grain pasta or a vegetable fortified pasta.  I will make it with meatballs or add ground meat, onions, mushrooms, eggplant, or anything else I have in the fridge.  It is a great base sauce and is also delicious on its own.

The parsley is optional and if I do not have it in the house I will skip it.  I do think it adds a really nice freshness to the dish.  If you are going to use the parsley you will just want to be sure that it is very finely chopped.  I am more careful these days about using canned tomatoes because of BPA in the lining and have found some really nice tomato products in cartons.  All the more reason to eat this sauce often 🙂


Prep Time: 10 Minutes

Cook Time: 20 Minutes

Yield: 4-8 servings


1 box of pasta

2 tablespoons olive oil

4-5 large garlic cloves, chopped (but still chunky)

1/4 teaspoon red pepper flakes

26 ounces of crushed tomatoes

5-6 large basil leaves, torn plus more for garnish

1 tablespoon finely chopped Italian flat leaf parsley

1/2 teaspoon Kosher salt

Freshly ground black pepper


In a large skillet add olive oil, garlic and red pepper flakes.  Sauté over medium heat until the garlic has softened, but not browned about 2-3 minutes.

DSC_0516.NEF


Stir in the tomatoes and basil.  Season with salt and cracked pepper.  Reduce heat to low and let simmer for 15-20 minutes.

DSC_0539.NEF

Cook the pasta in a pot of heavily salted boiling water according to the package directions, or to al dente.  Drain pasta.

Toss the pasta with the sauce.  Garnish with torn basil leaves and chopped parsley.

pasta 3


3 Comments

Filed under Pareve, Pasta, Vegetarian

Pomegranate and Candied Pecan Salad

The theme for the kosher link up this month is “Pomegranate” (see below!) I admit I was not quite sure what I would come up with2014-09-14 17.04.32 for a pomegranate dish, but being that I have not posted for quite some time I was determined to write a decent recipe featuring the pomegranate. I think I have accomplished my goal! This salad is sweet, savory and full of flavor. It is also super easy and versatile.

For those of you not familiar with this ruby red fruit I encourage you to try it out. There are many health benefits of eating pomegranates as they are rich in antioxidants. Nowadays, you can find the juice in any grocery store, usually in the produce section.  If you are eating the seeds as opposed to the juice there is much less sugar and more fiber. Some people do not like the thought of actually crunching on seeds, but I love to add different textures to my food. The other aspect that normally keeps people away from eating pomegranate seeds is the fact that they are not so easy to get out of the fruit. There are several ways to get them out. I gently squeeze and tap them out of the membrane once it is cut in half. There are actually you-tube videos on how to do this!

Rosh Hashanah (the Jewish new year) is right around the corner. Pomegranates are often featured on the table during this holiday. This salad would be a lovely starter to a festival meal. It is also a really nice fall salad for any other day.

The ingredients are pretty basic, but you can really add whatever you like. If you are doing dairy, then crumbled goat cheese would be wonderful in this. To go along with the fall theme you could roast some butternut squash pieces and add them in as well. I love the butter lettuce because it is so tender, but you could also use romaine. Pecans are the epitome of fall which is why I picked them for this salad, but you could substitute any nut you like. The possibilities are endless! My favorite part of the salad is the different textures as well as the sweet and savory flavors. This will be one of my fall salad go-to’s in the future for sure!

Prep Time: 15 Minutes

Cook Time: 8-10 Minutes

Yield: 4 – 6 servings

Non stick cooking spray

1/4 cup water

1/4 cup sugar

5 – 6 oz pecan halves2014-09-14 16.59.03

1 pomegranate worth of seeds

1 head butter lettuce, washed and spun dry

1 can hearts of palm, drained, rinsed and chopped into rounds

4 scallions, chopped

2 tablespoons red wine vinegar

2 tablespoons pomegranate juice

4 tablespoons extra virgin olive oil

1/2 teaspoon kosher salt

Freshly ground black pepper

Preheat oven to 400 degrees F

In a microwave safe bowl heat up the water for one minute. If you do not have a microwave you can do this on the stove. You want the water to be hot, but not boiling. Add the sugar and 1/4 teaspoon kosher salt. Stir until the salt and sugar have dissolved and then add the pecans.  Coat the pecans with the sugar water.

2014-09-14 16.20.11

Coat a foil lined baking sheet with non stick cooking spray. Pour the pecans on to the sheet in one layer. Cook the pecans on the top oven rack until they are fragrant and toasted, about seven to eight minutes.   Remove from the oven to cool and set aside.

2014-09-14 16.37.37

To make the dressing pour the vinegar, pomegranate juice, 1/4 teaspoon of kosher salt and ground pepper into a bowl. Gradually whisk in the olive oil.

Pom dressing

Place the butter lettuce in a large bowl or on individual plates.  Scatter the scallions, hearts of palm and pomegranate seeds over the lettuce. Add the cooled pecans and drizzle the dressing over the salad right before serving.

2014-09-14 17.03.01

3 Comments

Filed under Pareve, Salads

Greek Crustless Quiche

Quiche is one of my favorite recipes.  It is incredibly versatile and easy to make.  Just change up the cheese and the veggies and IMG_0584you can have a new creation at any time.  My version is loaded with vegetables and low-fat cottage cheese and only three eggs and one egg white in the entire recipe.  Taking the crust off the quiche is another trick to cut down calories and fat.  The base is so delicious and flavorful that you will not miss the crust at all.  Traditional quiche recipes use a full fat crust, a dozen eggs and heavy cream.  My recipe is a lot more health conscious so there is no need to feel guilty eating this any day of the week.

The kosher link up for this month is a dairy dish in honor of Shavuot (see below!)  This is a Jewish holiday where it is customary to not eat meat.  Unlike other Jewish holidays filled with chicken soup and brisket, this holiday is known for blintzes, cheese cake and other dairy delights.  This quiche is perfect for Shavuot, and truly any other time of the year.

I often make this on a Sunday and then cut it up into six individual servings.  I wrap each piece in plastic wrap and then put them in a freezer bag in the freezer.  Just defrost a piece in the microwave for a healthy breakfast any day of the week.  It can also be served with a side salad, whole grain toast or veggie sausage for a great breakfast, lunch, brunch or dinner.


Prep Time: 10 minutes

Cook Time: 45 – 55 minutes

Yields: 6 – 8 servings


Nonstick cooking spray

1 teaspoon olive oil

1 small onion, finely chopped

1 small zucchini, diced

1 box frozen chopped spinach, defrosted

½ pint grape tomatoes

3 large eggs and 2 egg whites

8 ounces of crumbled low fat feta cheese

8 ounces of part skim mozzarella cheese

12 ounces low fat cottage cheese

Kosher salt and fresh cracked pepper


Preheat oven to 375 degrees F.

Sauté the onion and zucchini over medium heat until softened in the olive oil, about 5 minutes. Season the vegetables with a pinch of kosher salt and ground pepper.  Let cool.

IMG_0556

Defrost the spinach and squeeze out all excess water.  It is important that all the water is taken out of the spinach otherwise the quiche will not be right consistency.

In a large bowl combine the tomatoes, eggs, egg whites, cottage cheese and cheese. Add the onion, zucchini and spinach and mix well.  Season with kosher salt and freshly cracked pepper

Coat a 7 x 11 baking dish with nonstick cooking spray.  Add the mixture to the dish and make sure it is in a smooth layer going to all edges of the pan.

IMG_0568


Bake at 375 degrees for 45-55 minutes. The top should be golden and firm.  Let stand at least 10 minutes before serving in order for the quiche to set.

IMG_0572

3 Comments

Filed under Breakfast, Dairy

Easy Baked Ziti

Today is the end of Passover 2014. For those of you who are not aware, Jewish people are not supposed to eat anything that is IMG_0541leavened (called chametz) during Passover.  No bread, no pizza, no bagels, no pasta – no fun!  It is a nice holiday and I can appreciate the traditions, but anything that takes me away from my favorite foods for eight days is tough.  The kosher link up for this month is chametzfest – the celebration of getting to eat chametz again (see below!)  Since I have been a young child my tradition is to eat Italian food once Passover has ended.  Pizza and/or pasta is always on the menu.  For that reason I decided to share one of my favorite pasta recipes – baked ziti.

This recipe is great in that it is quick, easy and feeds a ton of people!  It can be easily doubled to feed two tons of people.  Using a jarred sauce saves time, although you can always make your own.  I use part-skim ricotta and mozzarella cheeses to make the dish a little bit lighter.  Since the ricotta is seasoned so beautifully you never miss the full fat version.  I use a foil backing pan so clean up is a cinch.  It is good enough to serve for company and a nice treat for a family dinner.  Leftovers are delicious the next day or day after.  You can also make this the day before you plan to serve it, put it in the refrigerator and then bake before eating.

Whenever I make this I get a lot of compliments and requests for the recipe.  Serve the ziti with a salad and some garlic bread and you have a great Italian meal – one that is good enough to celebrate the end of Passover 🙂


Prep Time: 15 Minutes

Cook Time: 45 Minutes

Yield: 6 – 10 servings


1 (16 ounce) box of ziti

1 (26 ounce) jar of your favorite marinara sauce, or you can make your own

1 (16 ounce) bag of shredded mozzarella cheese (I use part skim)

¼ cup Parmesan cheese

1 (15 ounce) container of ricotta cheese (to make it lighter you can use part skim)

½ teaspoon garlic powder

½ teaspoon dried basil

½ teaspoon dried oregano

1/4 teaspoon kosher salt

Freshly cracked black pepper


Preheat oven to 350 degrees F. Cook the pasta in a pot of heavily salted boiling water according to the package directions, or to al dente.

While the pasta is cooking combine ricotta cheese with garlic powder, dried basil, oregano, salt and pepper in a bowl. Mix well.

IMG_0529

Drain pasta into a colander. In a deep baking dish or foil pan place a thin layer of sauce at the bottom of the dish. Create a layer of pasta using approximately a third of the ziti. Spread half of the ricotta mixture over the pasta then add one third of the mozzarella cheese. Add a thin layer of the sauce. Repeat one more time.

IMG_0531

For final layer add one third of the pasta, a layer of sauce and one third of the mozzarella and all of the Parmesan cheese to the top.

IMG_0532

Bake for 35 to 45 minutes. The cheese should be completely melted and bubbling on top

IMG_0537

2 Comments

Filed under Dairy, Pasta

Meyer Lemon Martini

The kosher link up for this month is cocktails (see below!)  I was excited when I heard that this would be the theme as I do enjoy a IMG_0500good cocktail!  I then realized that I have never posted a drink recipe on this blog.  Well, it is high time that I do so!  I picked this martini because it was the first cocktail that I created on my own and it is delicious!

This recipe came about as many of my recipes do – totally on the fly.  I was having my sister and brother-in-law over for dinner.  I had prepared a fabulous meal and felt that I needed to serve a fabulous cocktail.  I had just picked up some meyer lemons from the store so I had them on hand, and I always have a bottle of vodka in my freezer 🙂  I put the two together and it was perfection – the the perfect balance of tart and sweet and very refreshing!

I love meyer lemons.  I only discovered them a few years ago from watching cooking shows (a favorite pass time before having IMG_0490kids!)  I had never noticed them in the store, but came upon them one day and decided to give them a try.  I use them for drinks, salad dressings, with fish and chicken.  I describe them as a cross between a tangerine and a lemon.  They are shaped like a lemon, but are more orange than yellow.  The taste is tart like a lemon, but slightly sweeter.  You can find them in most regular supermarkets or Whole Foods.  The only downside is that they are not always available all year long.   When you do see them in the produce section pick some up – you will not be sorry!

Prep Time: 10 Minutes
Cook Time: 5 Minutes
Yield: 4 servings

1/4 cup waterIMG_0482
1/4 cup sugar
6 meyer large lemons (if you cannot find them you can substitute 4 lemons and 2 tangerines)
3/4 cup vodka
2 sprigs fresh mint

Create a simple syrup by combing 1/4 cup sugar and 1/4 cup water in a small saucepan. Bring to a boil. Stir the sugar until it is totally dissolved and remove from the heat. Allow to cool completely.

Juice the meyer lemons and place into a pitcher. Add the vodka, simple syrup, sprig of mint and stir.

If you are not serving the martini right away you can allow the drink to chill in the refrigerator. You can also pour it into a martini shaker with some ice and shake until frothy and ice cold right before serving. Garnish with a mint leaf.

IMG_0499

6 Comments

Filed under Drinks